3.2.2. UHDAS Gui Tour
3.2.2.1. UHDAS Overview
“UHDAS” refers to a suite of programs designed for the serial logging of ADCP and supporting data streams. It can be started from the command line or by clicking the icon bearing the UHDAS logo on the UHDAS computer’s task bar.
Most UHDAS installations use the name “currents” for this computer.
Initializing the program brings up a GUI interface through which the ADCP Operator chooses the configurable parameters and controls logging through a number of tabbed screens. To learn more about the screens, take the UHDAS Gui tour following the links at the bottom of this page. The tour pages are generic examples for a combined os38nb interleaved and nb150 installation.
IMPORTANT:
ONLY the official ADCP Operator should make changes to the ADCP acquisition configuration. There are only a few configurable parameters. Should you want to make changes, please make the request to the ADCP Operator and help us to maintain the integrity of your UHDAS acquisition system.
3.2.2.2. UHDAS performs the following tasks:
creates a directory structure to receive the serial data
reads configuration files for setup
initializes the ADCPs via a serial dialog
controls logging of ADCP data and other serial data streams
starts additional threads related to acquisition or processing such as:
parsing raw serial messages and writing them in a binary format
creating binary files with navigation and attitude gridded to individual ping data with time corrections applied
backing up of data to additional disks
output of a speedlog message
Additionally, near real-time processing runs simultaneously with UHDAS data acquisition. The processing is a suite of scripts that periodically
edit and average single-ping data into 5-minute profiles
makes plots of the last 5-min averages
perform full CODAS processing on the averaged data
make overview plots of the last few days of data.
UHDAS Best Practices has some additional guidelines about running UHDAS.
3.2.2.3. Control Tab
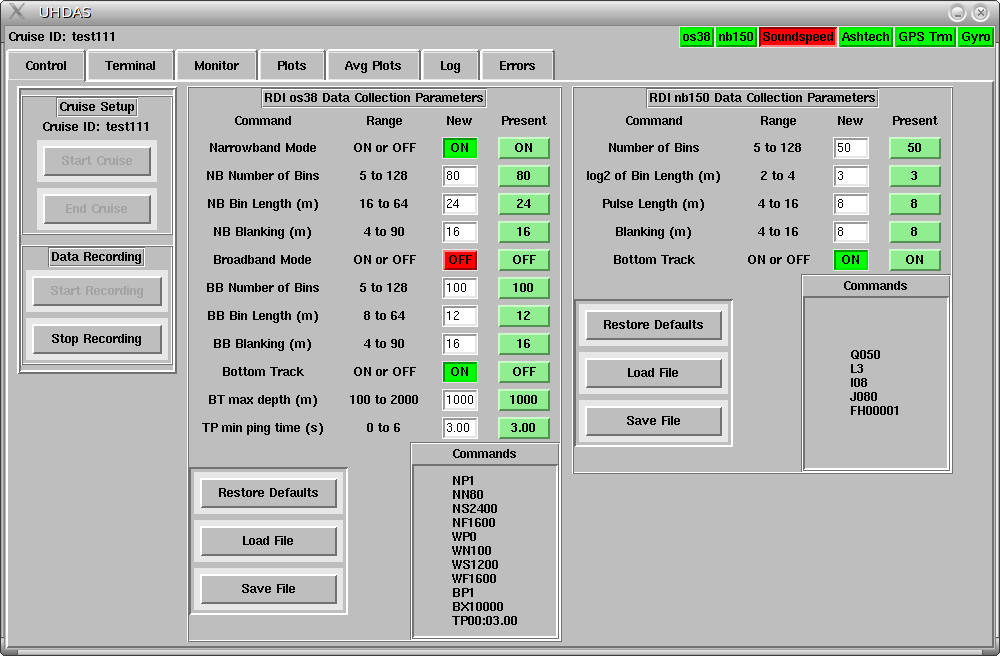
When UHDAS starts, it starts in the Control Tab. This location controls three aspects of UHDAS:
Cruise Setup: Start or End a cruise. (By cruise we mean creating or linking to specific directories on the internal hard drive and the external USB drive.)
Data Recording: Start or Stop data recording. (By recording we mean actually acquiring data from the instruments and writing it to the cruise directories created in step 1).
ADCP Collection parameters: eg. OS38 and NB150
These aspects are described below.
3.2.2.3.1. Cruise Setup
Start Cruise
This asks the user for a cruise identification, which should be a name like “nbp0407” or “lmg0413a”. This name is used to create the directory /home/data/cruiseid which will support logging and processing for both ADCPs. UHDAS also creates a symbolic link from the generic name “/home/adcp/cruise” to the new logging directory.
After creating this directory and link, UHDAS is ready for data logging.
It is possible to resume logging to a previous cruise, e.g., if you stopped both data acquisition and the cruise when all you really wanted to do was to stop data acquisition. Enter the previous cruise name. UHDAS will tell you it exists and ask you to confirm that you want to continue. Answer “Yes”.
Note
If a synchronization pulse (also called a “trigger”) is used with the Ocean Surveyor, be aware that data quality will be reduced as fewer pings are used. If the ADCP is triggered
USE ONLY ONE PING TYPE, i.e.
do not use interleaved pings
do not use bottom track
Synchronization is set up in this part of the GUI. The RDI manual page is here.
End Cruise
After data logging is stopped, the user can choose “End Cruise”. This tells UHDAS to clean up temporary files from the (now finished) cruise, copy several directories to /home/data/cruiseid for archiving purposes, and remove the symbolic link “/home/adcp/cruise”. Final copying of files to backup disks takes place at this stage and may take some time – be patient as UHDAS completes its work. It may take up to 15 minutes. It is important to run “End cruise” prior to unmounting the USB drive, since this step copies the last of the data to the drive.
It is possible to resume logging to a previous cruise, e.g., if you stopped both data acquisition and the cruise when all you really wanted to do was to stop data acquisition. Choose to “Start Cruise” and enter the previous cruise name. UHDAS will tell you it exists and ask you to confirm that you want to continue. Answer “Yes”.
3.2.2.3.2. Data Recording
Start Recording:
Data logging (recording) can only begin if a cruise has been started (see above).
When the “Start Recording” button is pushed, UHDAS starts a dialog with each of the ADCPs in succession, displaying the dialog in the Terminal Tab. Once communication has been established with all ADCPs, it turns on data acquisition for each of the other configured serial inputs, and switches over to the Monitor Tab for display. All logging is started with this button.
Stop Recording:
All data logging is stopped with this button. A cruise can only be ended if data recording is stopped.
3.2.2.3.3. ADCP Collection Parameters
Each ADCP has a default configuration which is available for viewing and modification. Except for toggling bottom track mode OFF or ON, these parameters should never be changed. Default parameters for each instrument are contained in a file that is read by UHDAS when it starts. Values in the gui can be entered at any time, but only take effect when data recording is (re)started.
To toggle bottom tracking mode, click “Stop Recording”, (wait a few seconds for it to respond). All data logging will stop. Then click the ON/OFF button for bottom tracking for the instrument(s) of interest, and click “Start Recording”. All data logging will start again.
In this example:
NB150:
This instrument is a higher frequency than the OS38 and is capable of much higher vertical resolution. Its range is only 200-300m on the icebreakers, because of the presence of the protective window. The NB150 is set with 8 m bin size.
OS38:
Ocean Surveyors are capable of running in either narrowband or broadband mode. Narrowband mode has slightly deeper profiling than broadband mode but lower resolution; broadband mode has higher resolution than narrowband mode at the expense of depth penetration. The Ocean Surveyor is also capable of interleaving these pings, which is what we prefer. We have defaults set up for bottom track ON, 12 m bins in broadband (bb) mode, and 24 m bins in narrowband (nb) mode. Our processing treats these data streams as if they came from separate instruments, though work is underway to combine them into a high-resolution, deep-profiling product.
3.2.2.4. Terminal Tab
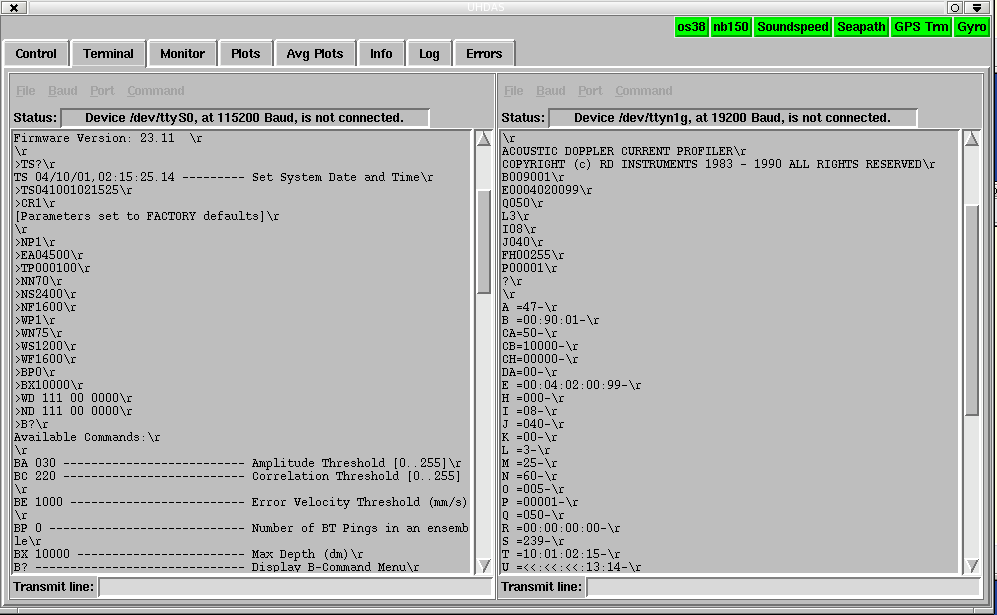
When UHDAS starts, it starts in the Control Tab. After “Start Recording” is selected, UHDAS moves to the Terminal Tab. This page shows a dialog with each instrument in turn, as communication is established and commands are sent. When pinging commences, UHDAS moves on to the Monitor Tab.
Before starting data recording, one can use these terminal tools to communicate with the ADCPs (or other instruments) for diagnostic purposes. When “Start Recording” is pressed (in the Control Tab), the communications settings in the Terminal Tab are reset to the defaults and a dialog is established with each of the ADCPs in turn.
3.2.2.5. Monitor Tab
UHDAS shows the status of data logging in 3 locations:
the Monitor Tab
small colored buttons in the top right corner of the UHDAS gui
the Log Tab (which has errors related to the logging code – used for diagnostics)
Each serial data stream is associated with a horizontal panel containing information about the serial port, instrument being logged, duration of logging, and a green panel with serial messages.
If data acquisition fails for some reason (serial port failed, instrument stopped transmitting…) then the time of current logging will turn red and the colored button (for that instrument) at the top right will also turn red.
Specifically:
All data streams are logging
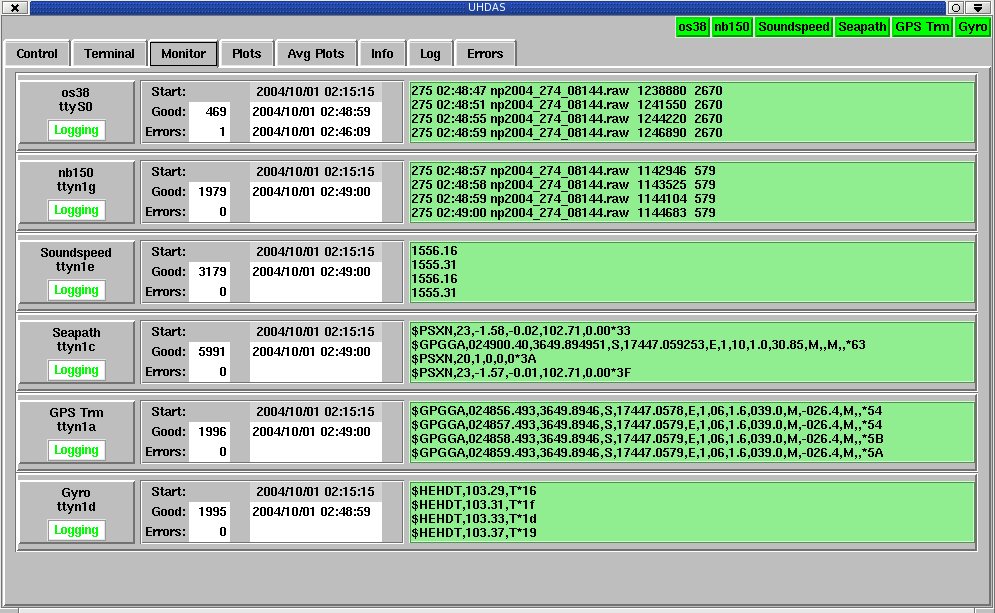
One datastream is not logging

3.2.2.6. Other Tabs
Plots |
5-minute profile plots |
Avg Plots |
3-day vector plots |
heading |
heading plot (eg. to monitor Ashtech) |
log |
text version of dialog with ADCPs in terminal window. This log is saved to the disk and the name of the text file is displayed by UHDAS |
errors |
errors from the logging software. |
3.2.2.7. UHDAS Control Files
All control or configuration files used by UHDAS (for logging or for subsequent processing) are stored in /home/adcp/config.
If a serial port fails or an instrument is added or subtracted from the expected assemblage, that must be changed in the file “sensor_cfg.py”. The other two (os38_default.cmd and nb150_default.cmd) should not be changed.
UHDAS (DAS.py, the gui which runs the underlying Python and C code) needs sensors_cfg.py to create the directories into which data recording occurs, and needs the *_default.cmd files to correctly initialize the ADCPs.
filename in: /home/adcp/config |
used for |
when to change it |
sensor_cfg.py |
|
change when a serial port fails or instrument changes |
proc_cfg.py |
for each ADCP, sets up
|
rarely; only if default processing parameters must be changed |
uhdas_cfg.py |
for each ADCP, sets up
|
rarely; only if outgoing mail server or “send-to” list changes |
Instrument ping defaults are in /home/adcp/config/cmdfiles.