2.4.1. UHDAS and adcp_database_maker.py
Note
Directory Strategy
To simplify the documentation, these instructions assume you have set up your directories as in Directory Setup and you are doing your processing demos in my_codas_demos/adcp_pyproc
your practice directory                 source
-----------------------                -----------

my_codas_demos
my_codas_demos/adcp_pyproc                 (new, WORKING IN HERE)
my_codas_demos/uhdas_data                  copy of codas_demos/uhdas_data
my_codas_demos/vmdas_data                  copy of codas_demos/vmdas_data
my_codas_demos/uhdas_style_data            (new, empty, for VmDAS conversion)
Click the image of the adcp_database_maker.py overview to enlarge.
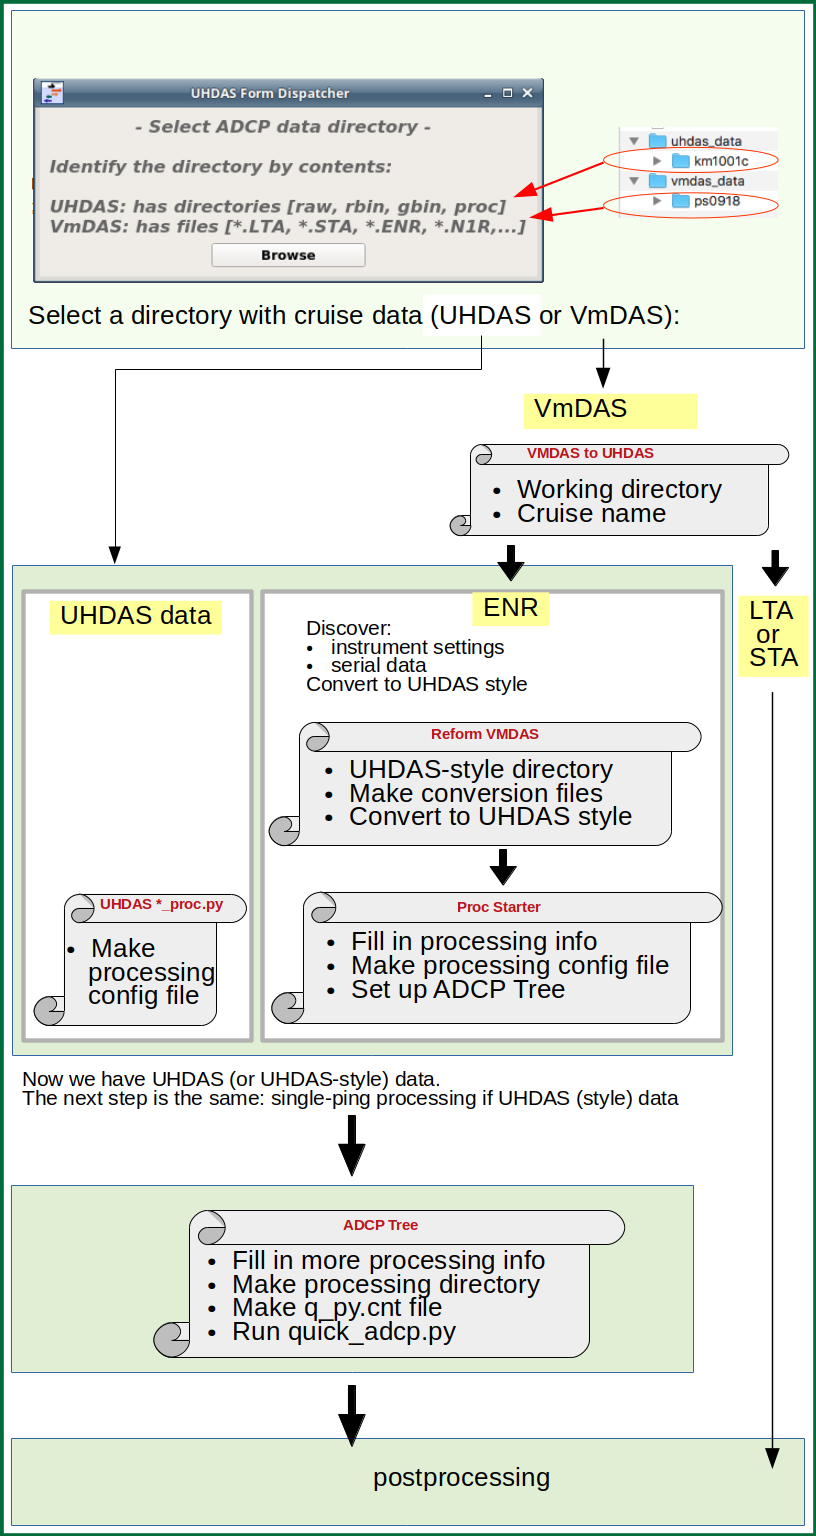
Run adcp_database_maker.py from your adcp_pyproc directory:
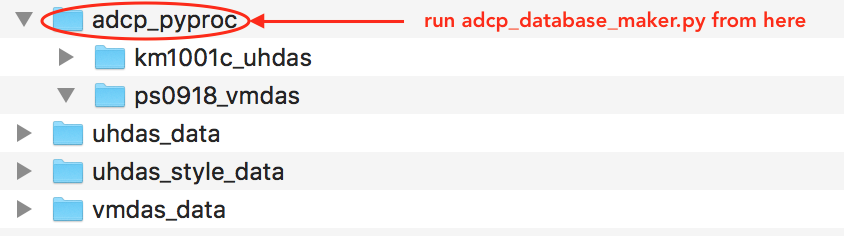
cd ~/my_codas_demos/adcp_pyproc
 adcp_database_maker.py
The splash screen will pop up:
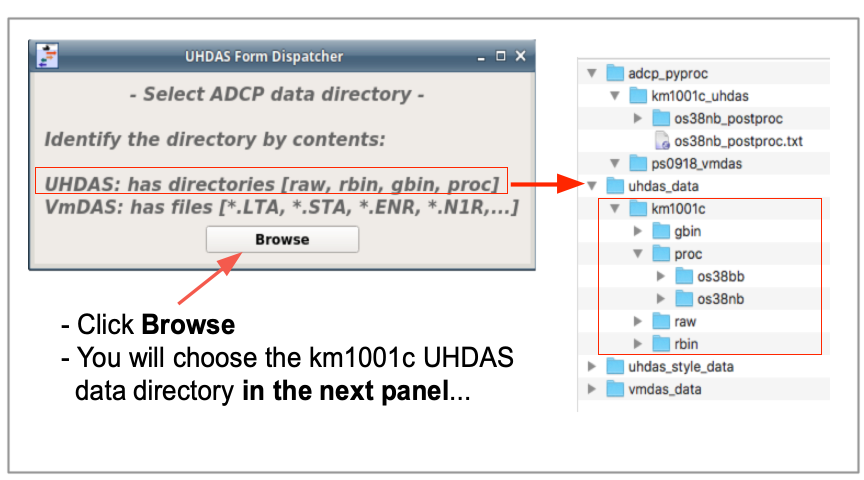
Click browse and the following screen will show up:
Navigate to the uhdas_data directory (click the up-arrow)
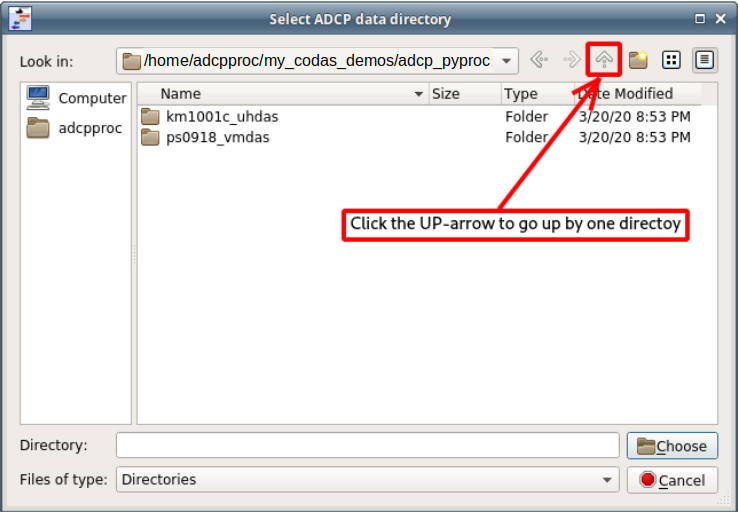
Select the uhdas_data directory:
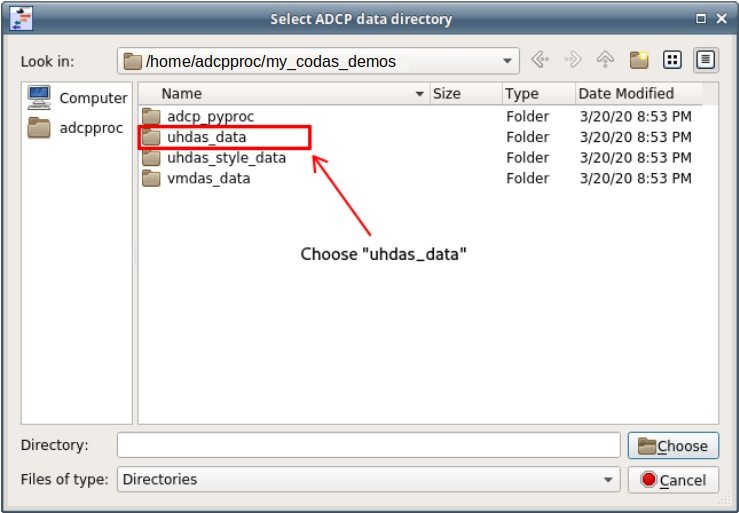
and choose the km1001c directory:

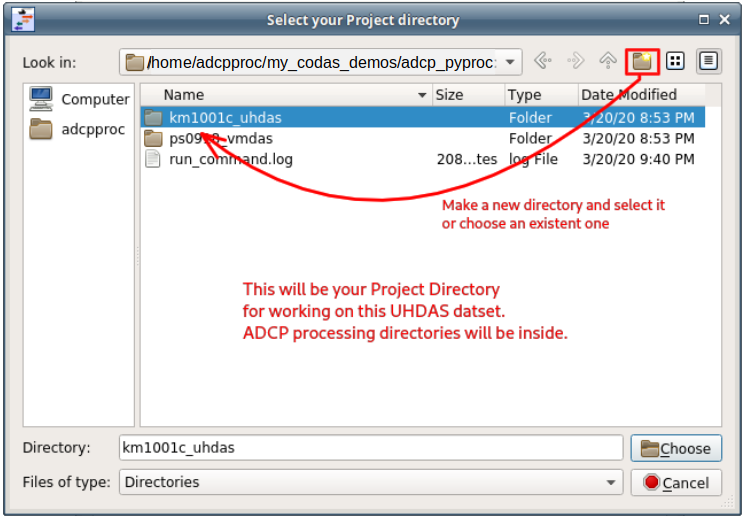
The Processing Configuration Form will pop up. Make sure you have the
right Project Directory selected. Click on the image to enlarge.

If you just did the post-processing demo, you can use the same Project Directory (km1001c_uhdas).
Click Browse to select (and/or create) a directory for your work.

Then create a new directory or choose an existent a directory for processing.
After selecting the Project Directory it will be also necessary to
fill the information about the cruise and other fields in the form.
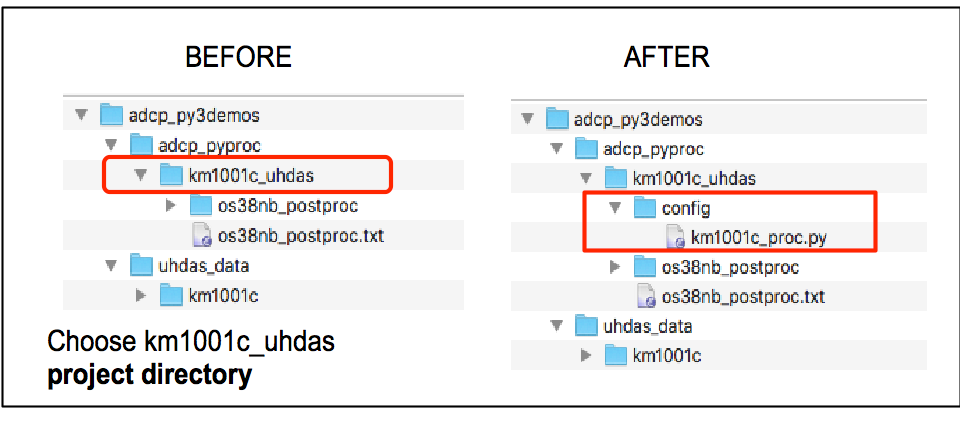
Most of the information can be found in the files in the proc and
config directory inside the cruise directory (km1001c/proc/os38bb/config).
For instance, in the file cruise_info.txt there is information on the
cruise date and in the file km1001c_proc.py one can find
information about the feeds, sensor alignment and so forth.
With all these information in hand, one can fill up the Processing Configuration Form
above. It would end up like the following figure: (click to enlarge)

Make sure you fill up the contents marked on the red squares (or “disable” the check buttons when necessary).
Click on Make Config File button (marked with a green rectangle),
see if there were any error or warnings in the Log Messages window
(marked in yellow)
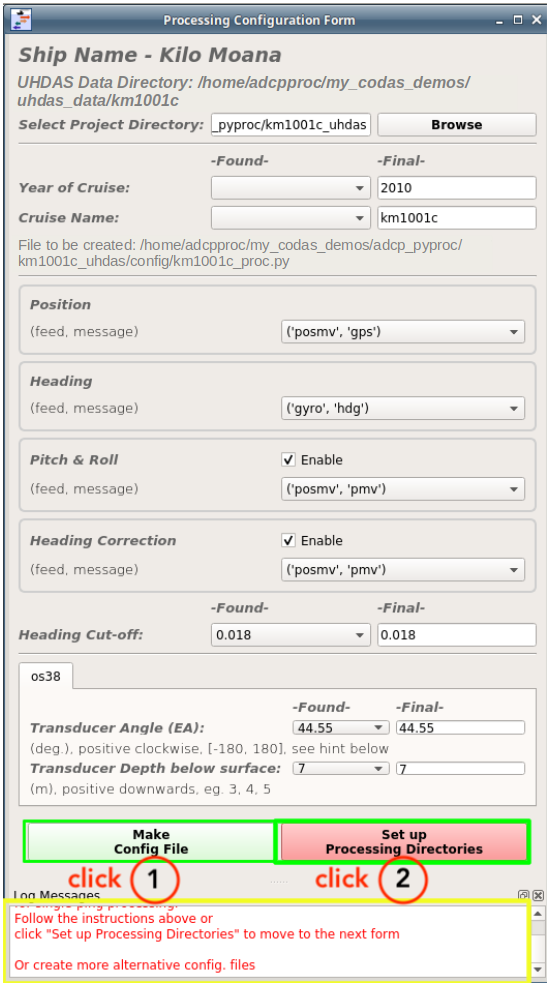
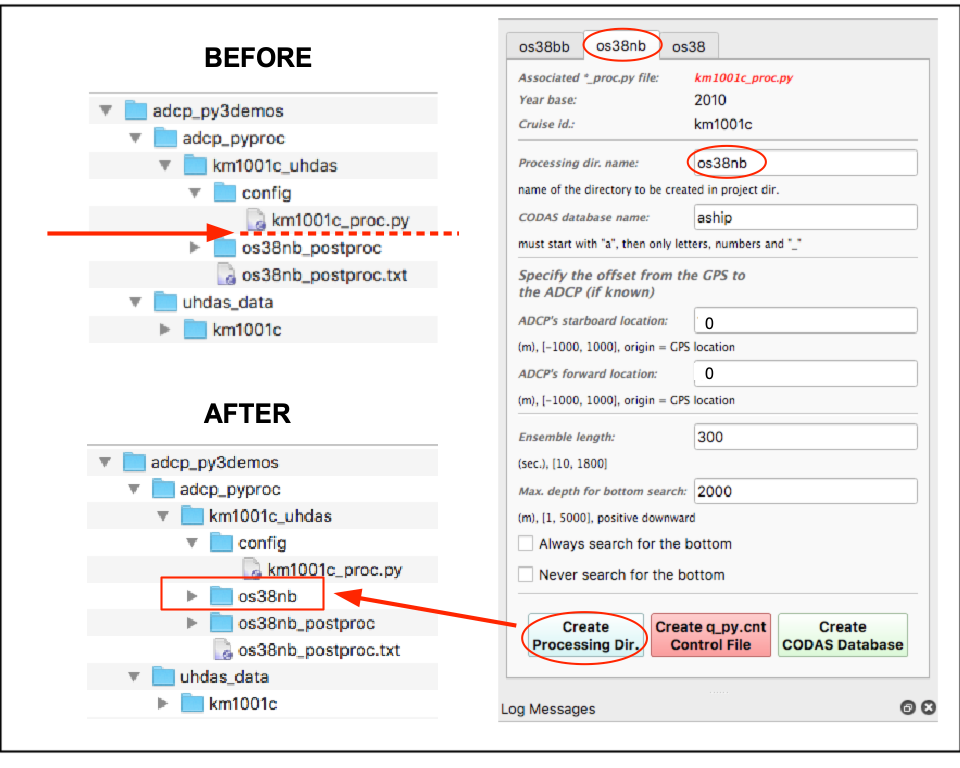
Now click Set up Processing Directories (the button on the right). This takes us to the next form, where we actually setup and run the preliminary processing.
Now we work on the specific instrument and ping type desired. The available sonars are in the tabs at the top of the form.
First we run
adcptree.pyto create the Processing directory. (Here is the similar step in the UHDAS command-line example)
Note
Be sure to choose the instrument+pingtype you want. This demo processes the os38nb directory, so click the MIDDLE Tab.
Now we need to set up a control file within the processing directory. This is used for sonar-specific processing settings in the preliminary processsing.
the control file is usually called
q_py.cntand resides within the processing directory for the sonar chosen.
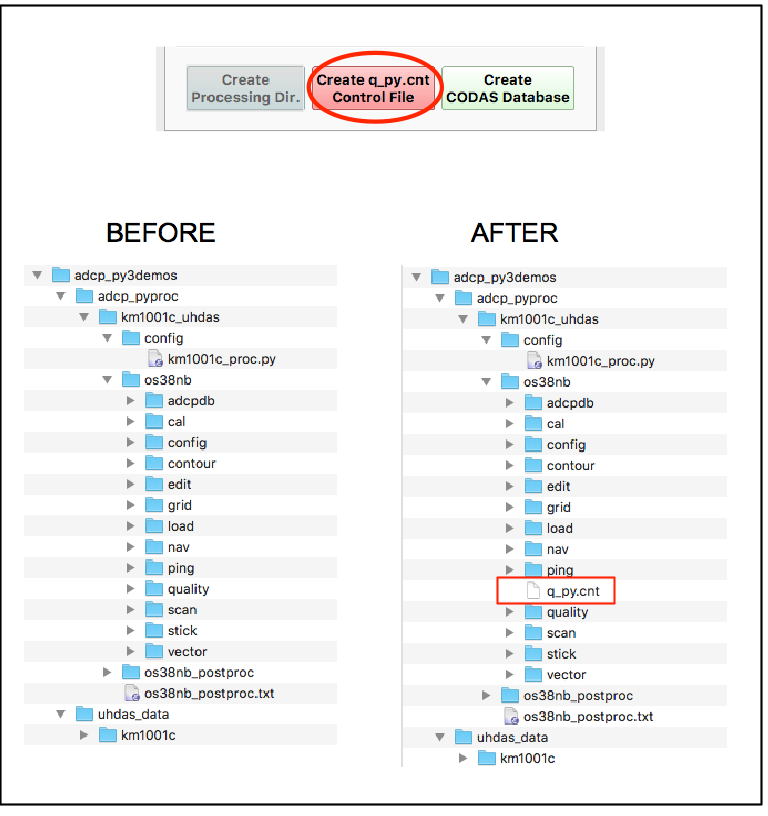
The command-line demos go through the underlying steps in more detail. Specifically, details about
Last, click the button Create CODAS database to do the preliminary processing.
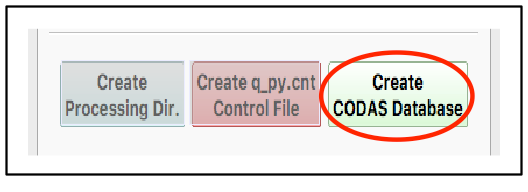
Note
For a real cruise, this step can take a long time. You’ll see a spinning disk or some indicator of time passing and your inability do to anything. If you want some feedback, run this command from within the os38nb directory:
tail -F /home/adcpproc/my_codas_demos/adcp_pyproc/km1001c_uhdas/os38nb/load/write_ensblk.log
or navigate with a file browser to the load directory and
watch the files being generated.
After processing (for instance) os38nb you can choose os38bb and again,
create the sonar processing directory
create the q_py.cnt file
Create CODAS Database
The demo cruise had os38bb and os38nb running in interleaved mode for the whole cruise.
You can create processing directories for os38bb and os38nb but for this cruise, there is no benefit to the last tab called os38
Some cruises alternate in big chunks, eg. broadband mode over the continental shelf and narrowband mode over deep water. There might be a use for the mixed-ping mode.
Now you are ready for post-processing.
Go to the UHDAS postprocessing demo<PostProcessing_uhdas> to see the steps for postprocessing this cruise. That means
start in this location in a bash terminal window:
cd /home/adcpproc/my_codas_demos/adcp_pyproc/km1001c_uhdas/os38nb
look at all the figures with
figview.pylook at the adcp data with
dataviewer.pycheck the heading correction
check the calibration
manual editing with
dataviewer.py -eextraction of netCDF and/or matlab files
creation of the little web site with figures
Available Demos
adcp_database_maker.py
commandline details